Thursday 12 January 2012

Sticky Cinnamon Rolls


I seriously can't wait to tell you about this recipe just because of how great it turned out and how delicious it tastes. I wasn't expecting too much when I made it, but boy was I surprised. It is probably one of the most delicious sweet recipes I've made, and it puts any of the shop bought cinnamon rolls that I have eaten before to shame. If you are going to make this don't miss out the sticky caramel sauce for the top as that is what transforms the rolls from good to absolutely brilliant. It's also how well the pecans work with the caramel, and cinnamon which is just truley scrumptious. The best thing is if you eat them warm; imagine a steaming cinammon scented roll topped with with warm melted caramel and toasted pecans, how can it not be good?! Have I tempted you yet? If so get baking now! Hurry, quick!

Makes: 14 rolls
Preparation time: 4-5 hrs

Recipe

Ingredients:

Dough
4 1/2- 5 cups flour (I used strong white bread flour)
a 7g satchet of dried yeast
1 cup milk
1/3 cup butter
1/3 cup white sugar
1/2 tsp salt
3 eggs
3 tbsp cream (for the glaze)

Filling

3/4 cup light brown sugar

1/4 cup flour

1 tbsp ground cinnamon

1/2 cup cold butter cubed


1 tbsp cream
1/2 cup chopped nuts/ raisins
Caramel Topping
3 tbsp light brown sugar
3 tbsp caster sugar
3 tbsp cream
3 tbsp butter
1/2 cup chopped pecans


Sugar Glaze
1/2-3/4 cup icing sugar
1 tbsp cream
a few drops water

Method:

1. Make the dough: in a bowl mix the yeast and flour.


2. In a saucepan warm the milk, butter, sugar and salt till all the butter melts.


3. Slowly beat in the butter mixture into half of the flour mixture.


3. Now beat in the eggs one by one. Beat the mixture for at least 3 mins.


4. Slowly add the other half of the flour mixture, use a dough hook or a wooden spoon to mix.


5. Once the dough comes together it shouldn't be sticky when you touch it, and it shouldn't be hard (don't add too much flour). On a lightly floured surface, knead it for at least 5 mins. Place in an oiled container and cover with a damp tea towel or an oiled piece of clingfilm for around 2 hrs in a warm place, till the dough doubles in size.


6. Once the dough has double in size punch it down and let the dough rest for 10 mins.

7. Make the filling: in a bowl add the sugar, flour, cinnamon and mix. Now add the butter and cream and using a knife cut the butter into the mixture till it looks crumbly.


8. Roll out the dough on a lightly floured surface til it reaches a 30cm square (or a rectangle like mine).


9. Sprinkle the filling mixture and chopped nuts/raisins on top of the dough. You can also sprinkle some extra brown sugar combined with some cinammon to ensure good coverage.


10. Roll the dough keeping it tight.

 
11. You should now have a tight dough roll.Cut of the ends

 
 12. Divide the dough into 14 equal pieces.

13. Place into an oiled container (I used a cake and flan tin). Cover with oiled cling film and allow to rise for around 1-2hrs.


14. You can either bake the dough now or tommorrow if you place it in the fridge and then leave it at room temperature for 30mins before baking tommorrow. If baking, use a pastry brush to coat the surface with cream. In a pre-heated oven at 190C bake for 20-30mins till the rolls are browned.

15. To make the caramel sauce: Toast the pecan nuts in the oven for a few minutes. Place the sugar, butter, and cream into a saucepan and heat till all the butter is melted and all the sugar is dissolved, and the mixture looks like caramel. Add the nuts into the caramel. Now drizzle this caramel sauce over the cinammon rolls (easier to leave the rolls in the tins).


16. Make the sugar glaze: Mix the icing sugar and cream together and add a few drops of water till the right consistency is achieved (it should 'drizzle').Once the caramel sauce and buns have cooled drizzle this cugar glaze on top.


17. They're ready to eat!


Source:
Joy of Baking


A post from the Fullest of Life

Tuesday 10 January 2012

4 Plait Braided White Bread

Today I tackled bread making. I have not always been that confident at making bread, and when I did make it the last time the loaf turned out hard and didn't rise. So you can understand why I don't really delve very much into the world of bread making. But today I felt optimistic and thought I would give it a go. I searched for a basic bread recipe and found one on the Good Food Channel. So I began, combining all the ingredients together and of course it turned out be be a big sticky mess and as much as I avoided getting my hands too messy I realised that there would be no other way; I don't have a bread maker or a food processor to do all the work for me so I didn't have any other option. My favourite part is the kneading, I can see how it can be quite soothing when you're feeling frustrated or angry, as you can put all this energy into the bread making. You actually need to kneed it for quite a while and you can't be too gentle; I swear my arms got a good work out. It's so satisfying when the bread actually rises as you know that you've done something right at least. I didn't want to make an ordinary loaf as you can buy that from the shops, so I decided to make something a little bit more special and pretty: braided bread. There is a bread called 'Challah' which is braided and contains egg, it's traditionally eaten by Jews on the Sabbath. Whilst my bread wasn't a Challah recipe I still wanted it to look like one, so I learnt how to braid it on youtube. Did you know that you can make breads from a number of strands (e.g.3,4,5 and 6) each resulting in a different pattern? One day I will make all the different ones and see which one I like the best. But for now I decided to go with the 4 stranded, simply because it's an even number which sounds good. If you don't want this extra hassle of braiding, just put the dough in a loaf tin and allow it to rise. So I've finished the hard bit which is mixing, kneading and waiting for the dough to rise, and now I'm finally ready to bake it, I'll let you know how it turns out when it's done.

It's in the oven...


Baking...


Baking...


Oooo it's turning golden in colour...


Still baking...


Smells good, mmmm...


Done!!!


Have a look, what do you think?


Check out the crust, soo glossy!

 Look inside- light and airy!


Verdict: It seems to have worked! Now I have bread to make butties :-)

Makes: 1 large loaf
Preparation time: 5 hrs

Recipe 

Ingredients:
500g strong white bread flour
300ml warm water
2 tbsp olive/vegetable oil
2 tsp sugar
1 tsp salt
a 7g sachet of dried yeast
1 beaten egg

Method:
1. In a bowl mix the flour, salt, and yeast till well combined.


2. In another bowl mix the water, oil, and sugar together till all the sugar dissolves.

3. Slowly add the water mixture into the flour and mix with a wooden spoon (or use a food processor to mix).


4. The dough should start to come together. You'll need to use your hands at this point to bring the dough together and then knead the dough (use the palms of your hands and turn the dough whilst you knead it)  for 10 mins.

5. Put the dough in an oiled container and place a wet kitchen cloth or an oiled piece of cling film on top. Leave to rest for around 2 hrs in a warm place till the dough doubles in size.

6. Place the dough on a lightly floured surface and punch the air out, and knead for 2 mins.

7. Mould the dough to what ever shape you like; put in a loaf tin, make rolls, or braid. Loosely cover with clingfilm and leave to rest in a warm place for around 1-2 hrs till the dough rises/ doubles in size.Use a pastry brush to glaze the dough with egg wash.


8. Bake in a pre-heated oven at 200C for 25-40 mins (the time really varies with the type of oven used and the size of the loaf) till the loaf sounds hollow and is browned on the surface, if the loaf looks like it's burning on the top place some foil over it whilst baking. You can also turn the bread over (without the tin) for the last 5 mins so that the base also becomes cooked.
To confirm that the bread is done you can also use a meat thermometer through the base of the bread which should have a core temperature of 94C (200F).

9. Leave the bread to cool on a wire cooling rack or eat whilst it's nice and warm.
 

Source:
The Good Food Channel
Youtube


A post from the Fullest of Life
 

Sunday 8 January 2012

Mango and Cardamom-Infused-Coconut, Almond Tarte

I saw a recipe on Evan's Kitchen and realised that I didn't have any passion fruits, and since I recently bought new mini tart tins which I was excited about, I wanted to make it anyway but using the things I had in the cupboard: mango and coconut. Theoretically mango, coconut and cardamom can't really go wrong and are are a perfect combination, and this point was most definitely proven. My best friend made a mango, coconut, almond mille-feuille cake recently, she undertook the pain staking process of making the rough puff pastry from scratch, I helped with the whole layering process and I should say that it was a bit like torture as the pastry and mango custard smelt soo darn scrumptious, that whilst assembling it I didn't want to wait for the finished product, I just wanted to dig in then and there. Just look at the layers in the cake, it looks beautiful. I realise that the mini mango,coconut, almond tarts I made are an easier version, and play with the same flavour combinations of this delightful pastry cake. She also taught me how to make the roses out of mango slices, and I gave it a shot on these tarts. Note for the future: use fresh mangoes which are not too ripe, not the tinned ones as they break soo easily and it will take a lot more patience and attempts to get the roses right.


The tarts I made use sweet crust pastry which is way easier to make than puff pastry, and I think if I was ot use puff pastry I would just buy it. The pastry cases for the tarts were perfect, they were was light and crisp, I think that the addition of almond powder to the pastry was the secret ingredient. I remember making my first ever sweet crust pastry, it seemed like a lot of hassle when you can just buy the ready made stuff. But now I realise that it is actually more of a hassle to go to the shops to buy the pastry than to make it yourself. Pastry may frighten a few people but seriously trust me it really isn't as hard as everyone makes it out to be, as long as you follow these rules:

1. Keep the pastry as cool as possible, that is why you use only your fingertips when making the dough.
2. Don't over kneed/work the dough. The less you handle it the better. 
3. Rest the dough in the fridge after it has been formed into a ball and then again after it is rolled onto the tart tin.
4. Prick holes in the base of the pastry once in the tart tin so that it can rise evenly and allows the hot air to escape.

If you want to see how sweet crust pastry is made look at my previous post on 'Pumpkin Pie'.

Makes: 5 mini tarts
Preparation time: 2.5 hrs

Ingredients:

Pate sucre aux amandes (sweet almond dough)
60g cold butter
12g ground almond powder
100g plain flour
35g icing sugar
1/2tsp cardamom powder (optional)

Mango Curd
125g butter at room temperature
1 sheet leaf gelatin
1 whole egg
1 egg yolk
50g sugar
1/2 tsp cornflour
100ml mango puree


Cardamom infused coconut jelly glaze 
150ml coconut milk
1 1/2 leaves gelatin
1tbsp sugar
3 cardamom pods


Method:

Pate sucre aux amandes (sweet almond dough)


1. In a bowl add the butter, icing sugar, cardamom powder and ground almonds. Use a knife to cut the butter into the mixture. Finish off using your finger tips to lightly rub the mixture into a bread crumb consistency.

2. Add the beaten egg a little at a time and combine the mixture till it forms a dough which isn't too dry or too sticky.

3. Wrap the dough in clingfilm and place in the fridge to rest for at least 2 hrs.

4. On a lightly floured surface roll out the dough till it is 2-3mm thick. Then place on top of the tart tins and mould into the shape. Cut the edges leaving 1cm hanging edge around the pastry.

5. Place in the fridge for at least 30mins, ideally 1hr.

6. Prick the base of the tart with a fork. Place tin foil/ parchment paper over the tart and pour in baking beans/rice/lentils (to weigh the pastry down). Bake blind in a preheated oven at 170C for 15mins. Then remove the foil/parchment paper and beans/rice/lentils. Trim the edges of the pastry using a sharp knife. Bake again for a further 6-7 mins till golden brown in colour.

7. Leave to cool

Mango Curd


1. Leave the gelatin in cold water to soften.

2. In a saucepan add the whole egg, egg yolk, sugar, corn flour and mango puree, and combine. Heat till the mixture is thickened and just reaches boiling point, make sure you continuously stirr the mixture. Then remove from the heat and add the gelatin (squeeze the gelatin to remove excess water), stirr in.

3. Leave to cool down. When still slightly warm add the softened butter and mix in.

4. Use a hand blender to blitz the mixture, making it smooth.

5. Leave to cool.

Cardamom infused coconut jelly glaze


1. Place the gelatin in cold water to soften.

2. In a sauce pan add the coconut milk, sugar, cardamom pods, stirr. Heat on a low flame for 15 mins (it will come to a boil). Remove cardamom pods.

3. Take off the heat and add the gelatin (squeezed to remove the water) and stir in.

4. Leave to cool.

Assembly

1. Fill the tart cases with the mango curd and smooth (leave enough room to pour the coconut glaze on top).


2. Place in the fridge for 15-30mins.


3. Pour the coconut glaze over the mango curd (make sure that there are no cracks in the pastry otherwise the coconut glaze will leak out, you can patch up any cracks with the mango curd).


4. Place in the fridge till the coconut glaze sets to a jelly like consistency, it will take around 3 hrs.


Source:
Adapted from Evan's Kitchen


A post from Fullest of Life

Sunday 1 January 2012

3 Tiered Layered Chocolate, Caramel and Vanilla Cake Covered in Chocolate Ganache

 
HAPPY NEW YEAR!

I've been thinking it's 2012 for the past month already, but it's finally here! My new years eves are generally spent with family, friends, food, and fireworks, and this year was no exception. I also start every year with something sweet; it's just tradition. My mother was incharge of starters and mains, whilst I was in charge of dessert, naturally. I wanted to make something memorable, which marks the end of what was a great year and welcomes 2012 with a sweet, delightful start. I was lucky to have a lot of people to help me finish of the cake, and it was a definitely a big hit.

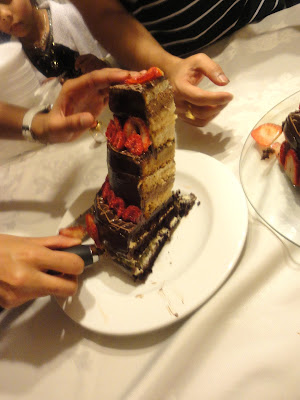
The cake turned out pretty well; the chocolate cake was moist, and the vanilla cake was so light. The chocolate ganache definitely tied everything together working well with all the flavours and gave the cake a nice glossy finish. It was good that there were 3 different types of cake as this meant the everyone got what they wanted, or a bit of everything for people like me.

If you want to make this cake, you will need whole day free; it does take quite a bit to time and effort, so if you're lazy then you may want to choose an easier recipe of just make 1 flavour cake and filling rather than going for the trio.

This cake was inspired by 'Dessert First Girl' and 'The Sweet Art', I ended up combining the 2 different cakes to make this.

Recipe 

The Base Tier: Chocolate Cake
20cm cake pan
Follow the recipe on 'Food and Wine', and split the mixture into 2 cake tins or bake in the same tin 3 times.

The Middle Tier: Caramel Cake
15cm cake pan
Follow the recipe on 'Dessert First Girl' for the caramel cake- make sure you double the quantities for the recipe.


The Top Tier: Vanilla Cake
12cm cake pan
Follow the recipe on 'Dessert First Girl' for the vanilla cake- original quantities.


Chocolate Cream Filling
Follow the recipe on 'The Sweet Art' for the chocolate mousse filling.


Caramel Cream Filling
2 cups double cream (whipping cream)
6 tbsp caramel syrup (recipe on 'Dessert First Girl')

Whisk the cream and caramel syrup together till stiff peaks are formed. Be careful not to over-whisk otherwise the mixture will curdle.


Vanilla Cream Filling
2 cups double cream (whipping cream)
2 tbsp icing powder
1 tsp vanilla extract

Whisk the cream, icing powder and vanilla extract together till stiff peaks are formed. Be careful not to over-whisk otherwise the mixture will curdle.


Chocolate Ganache
Follow the recipe on 'Dessert First Girl' and triple the quantities.


Assembly


1. Cut all the cakes so that they are level on the upper and lower surfaces.


2. Cut the caramel and vanilla cake into equal layers (I did 3 layers for each tier). It is crucial that the cake is absolutely flat on each layer, otherwise the cake may have a tilt.


3. Spread the fillings in whatever order you want between the cake layers. It is easier prepare each tier separately and assemble on top of each other at the end.


Freeze the cake for around 10mins between applying each layer.


The picture above demonstrates one cake tier: 3 layers of cake with 2 different fillings.

4. Neaten the outside of the cake by filling in the gaps with filling and smooth with a spatula. Make sure that the cake is completely symmetrical, and even. If you need to cut the cake a little, it is easier to freeze it before doing so. The 3 tiers:

Place these tiers in the freezer for at least 30mins before icing.

4. Ice each tier separately. Place the cake on some parchment paper on a wire rack. Make sure the chocolate ganache is cool and of a pouring consistency (if not then warm it very slightly). Pour the ganache over the middle of the cake, help the icing along with a spatula and use it to cover the sides too. Make sure the icing is smooth.


5. If you want to decorate the cake then melt 100g milk chocolate with 50g white chocolate and place in a piping bag with a really narrow tip. Draw some lines on the top of each tier with the chocolate.


6. It's tine to layer the cake. Carefully peel off the parchment paper from each cake and place on top of each other.


7. Decorate the cake with whatever you want or just keep it simple.

 
8. Cut, enjoy and share.


Sources:
Dessert First Girl
The Sweet Art
Food and Wine
Sweet as Sugar Cookies
 

A post from Fullest of Life